I really wanted to make this a top-10, but as hard as I tried, I could only pare things down to 11. So, without further adieu I present to you;
1. Read lots of protocols (not just the reagent manufacturer's protocol). Let's face it. If you ask a dozen people how to make a peanut butter and jelly sandwich, you'll end up with 12 different recipes. The same goes for FCM protocols. Everyone finds a different part of the protocol worthy of emphasis. If you read a few of them, you can start to put the entire story together.
2. Know which colors work best on your instrument. This is probably a bigger deal when you're using a core facility with a few different platforms. Let me tell you firsthand, no two cytometers are alike in their capabilities, not even two of the same model of cytometer. If you're lucky enough to have a flow cytometry core with knowledgable staff, make sure to ask them what their favorite 4, or 5, or 6-color panel is. They should also be able to tell you what the limitations of certain colors on a given instrument may be.
3. When designing your panel, look for max brightness with min spillover. Ok, let's say you know what sort of antibodies you want to run, and you know what's available, as far as hardware goes, at your institution. Now comes the fun part. You have a list of antibodies, and a list of fluorochromes - how do you match them up? You've probably heard the old adage, put your dim fluorochromes on the antibody that targets abundant antigen, and your bright fluorochromes on antibodies against sparse antigen. In addition to that you want to minimize spillover - fluorescence from probes that are excited by the same laser and whose emission overlaps. Spillover = Background, and Background = Diminished resolution. This takes some effort and a bit of know-how, so consult your friendly flow guru for help, or try out some of the new utilities designed to help with this process (namely CytoGenie from Woodside Logic or Fluorish from Treestar).
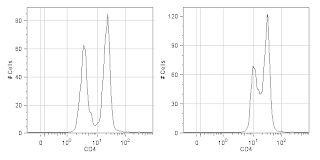
4. Titrate your reagents. What for? The manufacturer told me to use 5ul per test (usually 10^6 cells in 100ul of volume). Without jumping on the conspiracy theory bandwagon that reagent manufacturers tell you to use too much antibody so that you'll waste your antibody and have to buy more, I will say that I've found more times than not that the manufacturers suggested dilution is too concentrated. If you want to see why you should titrate your antibodies, check out the figure below. If you want to see how to titrate your antibodies, click on over to this prior entry to the UCFlow Blog.
 |
CD4 staining of fixed human PBMCs at the properly
titrated concentration (Left) and the manufacturer's
recommended concentration (Right).
|
 |
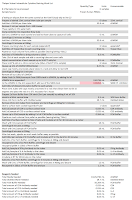
| Example Staining Worklist |
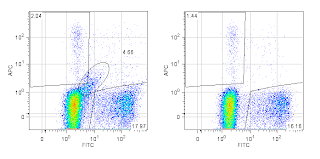
6. Always use a Dead Cell Marker. Dead cells can really screw up an analysis. I guarantee there is a color and assay compatible dead cell marker available for most every experiment you will do. There's no excuse not to use a dead cell marker, so please, please do it. It makes for a much nicer looking plot, and you really can't do good (dim) double positive enumeration without it.
7. Set up your FMO's as a separate experiment, not on your real samples. I won't discuss the merits of using an FMO control (Fluorescence Minus One), let's just assume you know that it's pretty much a necessity. What I will say is if you try and set up an FMO control on the day that you're using your precious sample, you're likely to either forget it, or omit it because you think you don't have enough cells. So, if possible, set up your FMO controls ahead of time on a different day so you can take your time getting everything set up properly. It'd be nice to include it every time, if you have enough sample.
8. Make compensation controls using beads. I'm a huge advocate of using capture beads to set up compensation. It's really a no brainer. I've written about this subject before. Even if your single stained controls look fine on cells, I'd still use beads because they're always consistent.
9. Acquire your samples nice and slow to achieve maximum resolution. If you go through the trouble of perfecting your staining procedure, now's not the time to screw things up. On a hydrodynamically focused instrument you'll want to concentrate your sample and run it slow in order to keep a narrow core stream and achieve optimal resolution. If you're using another type of flow cell (such as a capillary a la Millipore or an acoustically focused system like the Attune) you should be more focused on increases in background due to insufficient washing rather than a wide sample core.
10. Analyze your data a couple of different ways. Even if I have a clear idea of how to go about the analysis, I'm frequently surprised at how many times I've changed axes or started backwards and found I liked the new way better than the old way. Backgating is one way to help identify a rare population all the way up through its ancestry. Make sure to take advantage of your Live cell channel as well as gating out aggregates and removing any time slices where there may have been a drift in fluorescence.
11. QC your instrument and create an application specific QA protocol. Science is not about 1-shot deals. If it's not reproducible, it's not real. In order to give you the best possible chance of getting reproducible data you'll want to minimize the error contributed by the instrument. Quality control and Quality assurance cannot be emphasized enough. By doing something as simple as running beads at your application-specific voltage settings you can ensure that the instrument is in the same state as it was the last time you acquired these samples. For this, I typically use one of the peaks (peak 4, actually) of the 8-peak bead set. After I have the samples acquired with the proper voltage settings, I run the beads, create target channels for the peaks and save it as a template. Next time, all I need to do is dial in the voltage to put the beads in the target. You'll also want to make an Acquisition template and probably an analysis template too.
Well, there you have it. Hopefully this will help you focus your attention on some key aspects of setting up a well-thought-out flow cytometry staining protocol. Of course, this merely scratches the surface of all the things you need to think about. Did I miss something major? Feel free to leave a comment with your #12, #13, and beyond.

Lots of good stuff here, 99% of the problems I see with experiments would be solved by following this list. I also am a huge proponent of using capture beads for compensation, using a dead cell marker, and titrating reagents!
ReplyDeleteThanks Justin. If you find a way to incentivize people to follow guidelines like using capture beads, dead cell marker, and titrating please do pass it along ; )
ReplyDeleteThis comment has been removed by the author.
ReplyDeleteFlow cytometry is a laboratory analytical technique that can rapidly measure multiple parameters of individual cells or particles as they pass through a beam of light, typically a laser. The global flow cytometry market remains one of the fastest-growing segments of life sciences and clinical diagnostics markets. In the current life sciences research, pharmaceutical drug discovery and development, and clinical diagnostics markets, flow cytometry offers some of the brightest promise for growth and innovation.
ReplyDeleteHi,
ReplyDeleteI just stumbled upon this blog! I wish I had stumbled upon it earlier. I'm a novel user. I already use comp beads and FMO but haven't ever titrated my antibodies. When setting up an experiment would you run a compensation every time you get a sample or do it once at the start and leave the compensation the same per sample. Also with the FMO, using it to set the positive gate if this is slightly altered between treatment groups would you move it or leave it the same through out an experiment?
Look forward to reading more,
Hi Dijana,
DeleteOnce compensation is set up for a given experiment, all samples containing the same fluorochromes should use the same compensation matrix. This assumes your staining in the single stained compensation controls is as bright or brighter than your sample. This also assumes you've used the same antibody in your comp control as your sample when that antibody is coupled to a tandem fluor (e.g. PECy7, or Brilliant Violet 605).
Regarding the FMO setup of a positive gate. It would be ideal to have a single gate suffice for all treatment conditions, so if you can find a region shape that works for all variations, then great. If not, it is possible that you would need to move the gate, however you should try to understand why there is a difference. Is it because the treatment reagent is somewhat fluorescent and is increasing the background of your sample? Is the treatment increasing the number of dead cells and they haven't been excluded using a dead cell discriminator? Does the treatment change the expression of some receptors that bind antibodies non-specifically (e.g. FCgammaReceptor)? If you understand why a gate needs to be changed between conditions, this will be helpful in justifying it to a reviewer.
Thanks Ryan, I have to admit reading your blog was the first time I've heard of a dead cell disciminator. Such is the joy of not having anyone to guide you in flow. I'm sure my cell sample (human biopsies) would have a quite a number of dead cells.
ReplyDeleteHi Ryan,
ReplyDeleteThanks for the very nice article.
I am a PhD student, Recently trying my hands on Flow cytometry to analyse effect of our protein of interest on differentiation of Bone marrow derived macrophages. On increasing the concentration of our protein we are observing a quiet significant changes in FSC and SSC rather on CD86 of gated F4/80 population. Can you please what to conclude and how to analyse this kind of data where SSC and FSC changes when compared to untreated.
Thanks
Without seeing the data, my only piece of advice would be this: You do not need to (and in many times shouldn't) gate on light scatter first. Perhaps your initial gating strategies should focus on a live/dead marker and a high level (i.e. pan) macrophage marker. For example, gating on PI negative CD11b positive cells, and then look at F4/80 and CD86 subsets from that population. There's no reason you MUST gate on FSC and SSC.
DeleteHi Ryan,
DeleteThanks for the valuable advice.
What I had done was to Differentiate my bone marrow in presence of our protein at a conc of 0.1ug/ml, 1ug/ml and 3ug/ml along with untreated serving as control. Further we have acquired the data using FACS aria, and analysed by gating F4/80 (a macrophage marker) and analysed the expression of CD80 and CD86 within this gated F4/80 population.
We are observing a continuous decrease of CD80 at 1ug and 3ug of protein treatment as compared to untreated and not much significant change in CD86.
But keeping the gate constant we are observing significant decrease in SSC and FSC of population treated with 3ug.
So can we rely on this data, or can it be with treatment cells are dying and that is the probable reason of observing decrease in SSC and FSC at 3ug/ml treatment.
how Can I show and send my data to you
I would definitely want to rule out cells dying. You should be including a dead cell dye, like PI or DAPI, or something else compatible with your system. I would then like to confirm that, at the higher drug concentration, there is no significant increase in PI positive/dim cells. Or, if there is an increase, that these cells are removed from the F4/80 gate. If you'd like to send me data, you can do so to ucflow 'at' gmail 'dot' com
DeleteThank you very much for this nice writing about successful flow Cytometry experiment. I was searching for such type of blog as yours. Keep it updated.
ReplyDeleteUcflow - Flow Cytometry News, Reviews, And Tips.: 10 Steps To A Successful Flow Cytometry Experiment >>>>> Download Now
ReplyDelete>>>>> Download Full
Ucflow - Flow Cytometry News, Reviews, And Tips.: 10 Steps To A Successful Flow Cytometry Experiment >>>>> Download LINK
>>>>> Download Now
Ucflow - Flow Cytometry News, Reviews, And Tips.: 10 Steps To A Successful Flow Cytometry Experiment >>>>> Download Full
>>>>> Download LINK