Friday, November 13, 2009
Plant Sample Prep for Nuclei Analysis
We don't have too many Botanists coming through the flow lab doors, but occasionally they'll bring in some electric green looking slurry of stuff and want to analyze DNA content or Mitochondrial Membrane Potential. It's really no different setting these samples up on the instrument than any other animal/human sample. But, when they start to ask me questions on how to optimize their sample prep, I'm of little help. From what I understand, the process is much like dissociating any tissue. You use some mechanical (slicing and dicing with a razor) and enzymatic processes to try and isolate the cells from the leaves. Beyond that basic understanding of what's going on, I have little to offer, which is why I appreciate this troubleshooting guide so much. A fella by the name of Paul Kron, from the Department of Integrative Biology at the University of Guelph (Guelph, Ontario, Canada) sent me his top 10 troubleshooting tips for achieving good quality histograms when analyzing DNA content from plant material. There's probably some things in here you'll think are somewhat elementary, but isn't it always those elementary steps that are lacking when things aren't going quite right? A short, easy-to-read guide like this will ensure you've thought about some of the minutia involved in optimizing your DNA profiles from plant materials. A link to the top 10 can be found here: http://www.uoguelph.ca/~pkron/PaulKron/Top_10_FCM_Tips.html.
Monday, November 9, 2009
Do you Kaluza?
Seems like there's quite a bit of news coming out of Miami these past few months, and that is a good thing. Beckman Coulter (coulterflow.com) has released it's offline analysis tool, Kaluza, whose major feature seems to be speed. I've been playing around with Kaluza for about a month now and so I can share a few thoughts. You're probably well aware of the fact that we at the University of Chicago are a FlowJo shop. Nearly all of our users analyze with FlowJo (others use acquisition programs like CellQuest or FACSDiVa to do analysis). We've looked into other packages in the past (namely FCS Express and VenturiOne) but none were as exhaustive in capabilities as FlowJo, so we felt we were getting the most bang for buck in that case. What this basically means is that I pretty much look at all analysis software through a "FlowJo-colored lens." My impressions therefore, are fairly skewed towards that bias. With that being said, here's my first impressions on the windows-only (so sad), late beta version of Kaluza.
First of all, it is aesthetically pleasing to look at and interact with. They successfully pulled off the minimalist/high-tech look and feel of the software. Getting started with the software is easy enough. You load FCS files, apply analysis plots/regions/stats and that's it. I've loaded small (10K cells, 2 or 3 colors) files as well as quite large (5M cells, 10 colors) files. They initially load about as fast as you'd expect, within a few seconds up to 30 seconds, but once they're loaded, you can make adjustments, move gates around, recalculate stats very quickly. Moving around within the software is very snappy. This is a welcomed change of pace from FlowJo, which feels like an eternity when manipulating things like compensation on many large files at once. The second thing about Kaluza is navigation. Things like tabbed analyses, the radial menu, and 'office-like' ribbon menus make performing simple tasks inside the software, well, simple. There are a few things I'm a bit unclear of at this point. Apparently batching stats and pdfs are possible in the software, but i haven't quite figured that out yet. Perhaps now that it is out of beta, and user manuals are being put together, I'll be able to play around with that more. However, it is definitely not as powerful as the batching options in FlowJo (their words, not mine). Also, being from Coulter, the nomenclature of certain things is definitely derived from the clinical world, which takes some getting use to. Panels, Protocols, Tests, are all used in a strict clinical sense, and don't always translate directly to the research world, so figuring out what is what took a bit of effort on my part. I have a feeling, the 1st adopters will probably be Coulter hardware users and disgruntled FlowJo users. The speed of analysis is a tempting feature for potential converts, but I may hold off until version 1.x or maybe 2.0 and see what happens. Until then, if you're just dying to try something new, let me know. I'll probably load the software on one of our analysis computers so people can play around a bit if they'd like. Or, if you'd like to get a demo copy of your own, visit http://www.coulterflow.com/bciflow/kaluza.php and click on demo request.
UPDATE: (From Ernie Anderson, BC) FYI, batching stat and PDF output is pretty easy. Just load the files you want to process and select them in the analysis list. (The usual Windows SHIFT-click, CTRL-click, CTRL-A shortcuts work here.) When you have more than one analysis selected, the display is replaced by several buttons:
"Export statistics from selected" will produce a single file containing the displayed statistics from each analysis. Make sure you're showing the stats you want to display before you export. If you're not picky it's easy to just select all the plots and turn on all the stats.
"Print all sheets from selected" and "Print report sheets from selected" do what they say. If you want PDF output, choose a PDF printer driver. There's one on the program CD if you don't have one already. (Sorry, you didn't get that with the beta.)
Tuesday, October 13, 2009
New "Online" Tools from Coulter... Almost Useful!
If you hop on over to the flow cytometry centric Beckman Coulter portal, aptly named coulterflow.com, you'll see a link to some online tools. Tip #1: These aren't actually online tools. They are downloadable, standalone programs which pull information from the coulter web site as needed. Tip #2: They're pretty crude at this point. I can definitely see the utility they may bring in the future, but as of today, they need a lot of work. So, what are they? One is a fluorescence spectrum viewer, called Spectrios (a little corny, but hey, they're rebranding themselves), and the other is an Experimental Design Tool called Experimental Design Tool, but I've renamed it to ExDT. Spectrios does pretty much what you'd expect it to, but again, it doesn't seem ready for prime-time yet. The good thing about Spectrios is that it's a standalone program, so you don't need an active internet connection to use it.
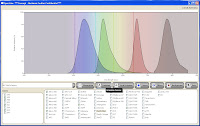
That being said, it's not nearly as good or as informative as the Invitrogen Spectra Viewer or the BD Spectrum Viewer (both online tools, though). Spectrios gives you the basics; Absorption curves, emission curves, laser lines, and filters. It does not calculate theoretical compensation nor allow you to add custom laser lines/filters. It is also lacking many fluorochromes from the list, but surely that will evolve over time. Spectrios and ExDT are so new and unpolished that they even forgot to take off the ***Concept - Beckman Coulter Confidential*** text in the header bar, and as is probably evident by now, these tools are still in Beta (v.0.9.0.7657).
Now here's where things get exciting. ExDT is a tool that will (once it's finished) greatly change the way you design your flow experiments. Built into the design tool are stock instrument configurations (laser lines, filters, # of detectors, etc...) and the entire Beckman Coulter catalog of Antibody/Fluor combinations. So, there are basically 4 steps to walk through (Screen shots below). Step 1 is a basic description of your experiment... Name, date, cell type, descriptions, etc.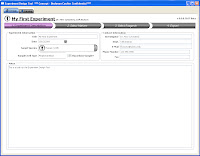 Step 2 allows you to select from the Beckman Coulter online catalog which markers you want to use. Now here's the fun part. As you go through and select which markers you want to use, the panel at the bottom shows you all the available Fluors for the markers, and tells you how many possible combinations can be put together to make your panel. Also, if you wanted to force one of your markers (say CD4) to definitely be PC7, for example, that will automatically narrow your possible combinations greatly. So, if you know that the CD4 PC7 is a really good antibody, and you definitely will use, just Pin the antibody to that fluor, and now you may go from 30 possible combinations to 6.
 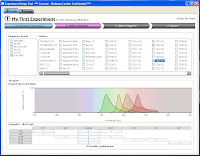 Step 3 then, simply allows you to flip through the possible combination and choose your panel.
 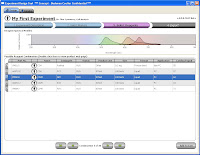 As you flip through the combinations, you get a "Spectrios-like" window showing you the emission curves so you can determine which panel you like based on available filters, or reducing compensation. Does it rank the combinations? Not sure if it does now, but that'd be cool. Does it allow you to upload your own catalog of antibodies? Not sure, but can you say awesome! Does it allow you to input your own instrument configuration with laser lines and filters, and then pick antibody/fluor combos to maximize sensitivity and minimize overlap? No, but if it did, I may faint with excitement. Finally, Step 4 allow you to set up your run list; Single stain controls, FMO controls, Sample tubes, etc... Oh yeah, you can conveniently click the "Add to cart" button just in case you don't have those antibodies on hand and you need to purchase them from "you-know-who." I call that Marketing Genius! Once you've made your run list, you can print it out and send it to your local Flow Cytometry Guru to give his/her blessing, and away you go.
 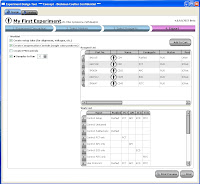 This tool has so much potential, I really wish it was working to its fullest right now. I have all these ideas swirling around my head on how I could use this yesterday. I guess we just play the waiting game now.

That being said, it's not nearly as good or as informative as the Invitrogen Spectra Viewer or the BD Spectrum Viewer (both online tools, though). Spectrios gives you the basics; Absorption curves, emission curves, laser lines, and filters. It does not calculate theoretical compensation nor allow you to add custom laser lines/filters. It is also lacking many fluorochromes from the list, but surely that will evolve over time. Spectrios and ExDT are so new and unpolished that they even forgot to take off the ***Concept - Beckman Coulter Confidential*** text in the header bar, and as is probably evident by now, these tools are still in Beta (v.0.9.0.7657).
Now here's where things get exciting. ExDT is a tool that will (once it's finished) greatly change the way you design your flow experiments. Built into the design tool are stock instrument configurations (laser lines, filters, # of detectors, etc...) and the entire Beckman Coulter catalog of Antibody/Fluor combinations. So, there are basically 4 steps to walk through (Screen shots below). Step 1 is a basic description of your experiment... Name, date, cell type, descriptions, etc.
 Step 2 allows you to select from the Beckman Coulter online catalog which markers you want to use. Now here's the fun part. As you go through and select which markers you want to use, the panel at the bottom shows you all the available Fluors for the markers, and tells you how many possible combinations can be put together to make your panel. Also, if you wanted to force one of your markers (say CD4) to definitely be PC7, for example, that will automatically narrow your possible combinations greatly. So, if you know that the CD4 PC7 is a really good antibody, and you definitely will use, just Pin the antibody to that fluor, and now you may go from 30 possible combinations to 6.
  Step 3 then, simply allows you to flip through the possible combination and choose your panel.
  As you flip through the combinations, you get a "Spectrios-like" window showing you the emission curves so you can determine which panel you like based on available filters, or reducing compensation. Does it rank the combinations? Not sure if it does now, but that'd be cool. Does it allow you to upload your own catalog of antibodies? Not sure, but can you say awesome! Does it allow you to input your own instrument configuration with laser lines and filters, and then pick antibody/fluor combos to maximize sensitivity and minimize overlap? No, but if it did, I may faint with excitement. Finally, Step 4 allow you to set up your run list; Single stain controls, FMO controls, Sample tubes, etc... Oh yeah, you can conveniently click the "Add to cart" button just in case you don't have those antibodies on hand and you need to purchase them from "you-know-who." I call that Marketing Genius! Once you've made your run list, you can print it out and send it to your local Flow Cytometry Guru to give his/her blessing, and away you go.
  This tool has so much potential, I really wish it was working to its fullest right now. I have all these ideas swirling around my head on how I could use this yesterday. I guess we just play the waiting game now.
Saturday, October 3, 2009
Imaging Indifference
I can't really get excited about imaging data. I don't know why, they're always really pretty pictures, but today I think I figured it out. Here's how a talk including imaging data typically goes. Slide 1: here is cell line x stained with Nuclear Dye A, and here is the same cell line stained with Membrane Dye B. Slide 2: now let's look at those two images super-imposed. (Ooos and Ahhhs radiate from the crowd). What do you do with that? How does this translate into some sort of metric than can be quantified and then objectively compared to a different situation or cell line. Flow Cytometry, on the other hand, is very quantitative, easily comparable, and believe it or not, objective. I understand the value of microscopy images, but I always feel like it should be validated and quantitated using some analogous technology like Flow Cytometry. Sorry Imaging folks... You may be asking yourself, well, if you're indifferent to imaging, why are you getting an ImageStream? Aha! Herein lies the power of the ImageStream. Pictures for the picture people, and quantitative data for the quantitative people.
Friday, October 2, 2009
Pre-GLIIFCA Core Manager Meeting
Well, another successful Core Manager Meeting just wrapped up here in PIttsburgh, PA. Topics presented ranged from Core Facility management, and cost recovery, to training issues, SOPs, and writing effective SIGs. Many of the talks recapped events from the NCRR/NIH Workshop in mid July. The overall meeting was entitled "Efficiency and Quality in the Management of Core Facilities: Best Practices for Running Your Core as a Business." I can honestly say, this Core Managers' Workshop provided some of the most useful information I've seen in years. It was great to hear many other core facilities around the country (and world...since we did have one attendee from Denmark) run into the same issues we do at the University of Chicago. We got some great ideas that we'll reevaluate once we get back home and see if we can implement a few of those things
Sunday, September 27, 2009
Sort Cancelation Policy
I started sending out emails stating the following:
Please be aware that the Flow Cytometry Facility will begin charging 1/2 of the originally reserved time for sorts that are canceled less than 24 hours in advance. Last minute cancelations result in lost revenue for the facility since it is highly unlikely someone will be able to occupy that freed time slot. We certainly understand when experiments go bad and sorting is not possible, and in those instances, we'd prefer that you call/email us to cancel rather than simply canceling your time online. Our current effort is aimed at penalizing those abusing the self-scheduling privileges. Please consider this as a friendly notification.
If you receive an email like this, it is because you canceled a sort reservation less than 24 hours in advance of the sort start time. Despite our efforts to get people to schedule sorts responsibly, on average, we're having 3 last minute cancellations per week. When these people cancel, they delete their time on the scheduling system anywhere between 30 minutes to 4 hours prior to the planned sort start time. What’s even more frustrating is that it seems to be the people who book large time slots (4+ hours) that tend to cancel last minute. So as much as 12-15 hours of prime sorting time can go unused per week. Of course, this is especially frustrating since there is a substantial wait time for sorting in the afternoon.
Now, as I say in the email, we certainly understand things go wrong, and will definitely give you the benefit of the doubt, but instead of just going to the online scheduler to cancel your sort, it is imperative to get a hold of someone in the flow lab and tell them personally that you will not use your sort time. Many times, we are spending 20 minutes setting up the instrument specifically for your sort...changing the tip, putting in the proper filters, aligning the appropriate lasers, etc... Also, we are sometimes aware of people who are 'standing by' just in case someone does cancel. If you can let us know immediately when your experiment goes awry so we can try to get someone scheduled for that time slot, we would greatly appreciate it.
How can you get a hold of us? Well, there are many ways, but here are the best ways.
- Call the lab at 2-9212
- send us an Instant Message at
'flowhelp''flowlabhelp' - Send an email to ucflow'at'gmail'dot'com
- stop by the lab in Kovler 037
Keeping track of last minute cancellations is a real pain, and I hate doing it, so please try to schedule your sort time responsibly so I don't have to do this anymore. Remember, schedule what you need, use what you schedule. Thank you.
Monday, September 21, 2009
FlowJo Training
Thanks to all who attended the large and small-group FlowJo training sessions on September 16. It was very successful, and we do intend to repeat this at least yearly. Can't wait that long, you say? Well, FlowJo offers 'intro' type online training session on the 1st Friday of every month at 12PM C.S.T. All you need to do is at 11:55AM on the 1st friday of the month, click on the following link, sign-in, and you'll receive a toll-free number so you can listen-in as you watch the demonstration from your own computer. Here is the link: https://treestar.webex.com/treestar/j.php?ED=109322642&UID=1022933222
Additionally, the flow facility will train you on-demand 5-days a week, from 9AM - 5PM. You can schedule this by calling the facility at 2-9212, or sending an email ucflow@gmail.com. We're also throwing around the idea of having FlowJo open office hours once a week that you can bring down your data analysis questions, and get some personalized help. For example, we could set up a 2-hour time slot on Tuesday afternoons, and be available for any FlowJo questions you may have. If this sounds like a good idea, be sure to let us know.
Additionally, the flow facility will train you on-demand 5-days a week, from 9AM - 5PM. You can schedule this by calling the facility at 2-9212, or sending an email ucflow@gmail.com. We're also throwing around the idea of having FlowJo open office hours once a week that you can bring down your data analysis questions, and get some personalized help. For example, we could set up a 2-hour time slot on Tuesday afternoons, and be available for any FlowJo questions you may have. If this sounds like a good idea, be sure to let us know.
Thursday, July 30, 2009
It's GLIIFCA Time!
 Registration is now open for the 18th annual Great Lakes International Imaging and Flow Cytometry Association (GLIIFCA) meeting. As I've said in years past, this meeting is great for the following reasons. 1. It's all about flow cytometry and imaging (part techno-geek stuff, part scientific stuff); 2. It's dirt cheap ($80 registration fee); 3. If you bring a poster you can apply for a travel award and you'll get $100; 4. You get to hang out with David!!! This year's meeting will be held in Pittsburgh, PA. (So, yeah, $150 for a roundtrip ticket, but c'mon it's worth it). If you're at all interested in this, send us an email and I can give you all the details. Also, you can find some info on the meeting as well as the organization as a whole at the following url: http://www.gliifca.org. Also feel free to distribute the flyer (in jpeg format) in the body of this post to anyone you feel may be interested.
Wednesday, July 22, 2009
BioPlex Manager Software Upgraded to 5.0

Although the upgrade has been available for quite a while, we finally got our BioPlex upgraded to the new software. As far as actually running the instrument, there's not that much of a difference in the work flow that would require re-training. It should look very familiar to you. The new features, however, are very useful, and exist mostly in the reporting of the data, and some new regression tools. Probably the single best feature of the new software is the graphs module. You can actually create very useful graphs right inside the BioPlex Manager Software. It's probably graphs that you're already creating inside excel, but not you can quickly and easily create them within the software and export as an excel graph, or as a bitmap image file. The best part is that you can do this on all the data you've ever created with the BioPlex, and to illustrate that, I took a results file that was on the computer, opened it up in 5.0, and created this graph shown above. It's basically showing you 9 cytokine levels of 2 samples (X9 and X10) in a bar graph. This literally took about 5 seconds to set up. Pretty cool. I was able to figure out how to do this without reading the manual in about 3 minutes, so the software continues to be very user friendly. Let me know if you want me to show you any of the new features, or if you find something cool yourself, be sure to pass along the info to us.
Wednesday, June 24, 2009
Antibody Titrations

 After the post below regarding the Alexa Dye conjugations, I had a few questions from users, not about the Alexa Dyes available, but about the titration, and choosing the optimal antibody concentration. Titrating your antibodies will go a long way towards achieving good quality flow cytometry data. A properly titered antibody will allow you to achieve the optimal separation between positive and negative without unnecessarily wasting antibody. This should appeal to you in multiple ways; better data, fewer experiments, and saving money. Below I will share with you the UCFlow, fool-proof method for antibody titration.
 The first things to look at are, what's your antibody, which cells should I use to titrate, and in which state do the cells need to be for maximal staining? The 1st one's a no-brainer, but what you should be aware of is on which instrument (i.e. lasers and filters) you'll need to run this antibody:fluorochrome pair. Other things to be aware of is what is the species, specificity, and isotype of the antibody in question. This may impact what type of blocking may be necessary. For example, a rat anti mouse IgG2a may require the use of an anti-Fc receptor blocking antibody (for example 2.4G2) prior to staining in order to minimize non-specific binding of the native Fc receptors by the rat antibody. Another example would be if you needed to stain human blood cells with a rabbit anti-human Ig. In this case, you may pre-incubate the cells in normal rabbit serum to avoid non-specific staining. Next, we'll need some cells on which we'll titrate the antibody, and we'll need to know in which state these cells need to be in order to achieve max expression of the antigen. Take, for example anti-mouse CD44. CD44 is expressed on multiple cell types (bone marrow myeloid cells, peripheral T cells, etc...), and at different levels on the same cell type (upregulated on peripheral T cells), so you want to make sure there is enough antibody to sufficiently stain the highest expression level without using so much antibody that your background is too high. So, in a case like this, it may be better to either use mouse bone marrow, or perhaps activate peripheral lymphocytes to achieve the highest expression level you may encounter.
Now that we know what and with what we will test, we can proceed to the actual testing. If forced to take a stab in the dark at an optimal antibody concentration for flow cytometry, I'd guess 1ug of antibody in a final volume of 100ul of anywhere from a couple hundred thousand to a couple million cells. With this information, I generally start my titration 10 times that value, and stain my 1st sample with 10ug of antibody in 100ul of cells ( i typically use 500,000 cells, but that's not as important as keeping the volume of the sample consistent). From there, I do 3-fold serial dilutions down to 0.005ug, which gives a total of 8 tubes. I do all the staining in a 96 well plate, so each antibody being tested conveniently fits in 1 column. So the math pretty much goes like this. Take 15ul of the antibody (if stock is at 1mg/ml concentration) and put it into A1. Put 10ul of buffer into A2 - A8. Take 5ul from A1, mix into A2 (thereby creating a 3-fold dilution) and repeat serially down the plate. Be sure to remove the 5ul extra from A8 and discard. So, each well has 10ul of the properly diluted antibody. To each well, I add 90ul of previously blocked cells (remember, you were suppose to block the Fc receptor with 2.4G2 - this can be done in bulk prior to putting the cells into the wells). Incubate, 15 minutes at 4C, wash 2x with PBS + 1%BSA, and resuspend in 250ul of PBS +1%BSA. Also be sure to save a small amount of the cells alone (i.e. unstained) for setting up the instrument. Set up the cytometer with the appropriate lasers and filters, and collect data files. You may ask yourself, what if my stock antibody is at a lower concentration, or, what if I'm using an antibody with unknown concentration because the vendor only told me to use 1ul per "test." First, call the vendor and demand the concentration, they may not give it to you, but if enough people complain maybe they'll get the picture that real scientists like to work with known numbers not arbitrary ones like "tests." Secondly, if you are told to use 1ul per test, you can pretty much assume that's way too much antibody (since they want you to waste antibody so you'll buy more), so maybe my top concentration would be 3ul/test, and do a 3-fold dilution from there.
Lastly, we can analyze the data and generate the metric called the Stain Index. Perform standard gating of the population of interested (e.g. lymphocyte gate, live gate, myeloid gate, etc...). For the antibody titration channel, you will need to set a gate based on the 10ug sample which best separates the data into positive and negative groups. You'll then need to move the gates down as the positive population gets dimmer (see Titration Image). You can try to use the magnetic gate feature, but it doesn't always work that well. Once you have the positive and negative populations gated, you'll want to request the Standard Deviation of the negative population and the Median Fluorescence Intensity (MFI) of both neg and pos. The stain index can then be calculated as (MFIpos - MFIneg)/SDneg. A scatter plot of Log Antibody Concentration versus Stain Index should yield a curve whose max Stain Index is the optimal concentration (See Stain Index Image).
And there you go, a very easy way to get to the ideal concentration of antibody for flow cytometry. Remember, the concentration is critical, so we always try to stain in a final volume of 100ul. If you need to stain large numbers of cells, for example if you are sorting, then you'll need to increase the volume, and the concentration as well (probably never more than 1mL, though). If you plan to do this routinely, then a smaller scale titration (3 or 4 tubes instead of 8) may be necessary.
Friday, June 12, 2009
Alexa Dye Antibody Conjugation

The Fitch Monoclonal Antibody Facility (MAF) on campus is now offering antibodies coupled to many of the Alexa dye flavors from Invitrogen. As you may know, the Alexa Dyes are small molecular weight fluorochromes capable of producing bright fluorescence and minimal photo-bleaching. These dyes are available in many wavelengths, and are named by their optimal excitation wavelength, for example Alexa 488 is optimally excited by the 488 laser, while Alexa 568 is optimally excited by a 568nm Laser. The facility is offering commonly used antibodies coupled to various Alexa dyes for purchase in small and large aliquot sizes. The coupled antibodies will be tested and titrated by the Flow Cytometry Facility as a quality assurance measure. Most recently the MAF coupled Alexa 488 to a Rat anti-Mouse CD4 antibody (clone GK1.5), the titration is shown in the embedded image. For more information on which antibodies are slated to join the mix, or how you can get your homebrewed antibodies coupled to an Alexa Dye, contact the Monoclonal Facility at 702-8756, or contact the Technical Director, Carol McShan at mcs7 'at' uchicago 'dot' edu.
Thursday, May 21, 2009
Live from Beckman Coulter Big Bang Event
I'm here at the Embassy Suites in Rosemont, IL for the big event. I'll post some updates as the day progresses, and possibly a few pics as well. There's a pretty decent turnout, maybe about 50-75 people. We're just getting underway! More later.
0913: Picomotor driven laser steering optics for fine tuning laser alignment...awesome
0914: Gallios = Research Instrument, Navios = Clinical Instrument.
0917: A vendor has talked about instrument "sensitivity" without quoting MESF detection threshold values...There really is a God! It's good to see my ranting and raving has not been in vain.
0924: The boulevard. Coulter's answer to the "Octagon". 18 degree reflection system which minimizes light loss.
0930: Definitely some nice innovation on the light scattering front. "Enhanced FSC" mode allowed resolution of 0.4um beads from noise as well as from 0.5um beads.
0948: FCS file is packed with all the necessary information to reproduce the experiment. (MIFlow?, XML compatible?)
0958: PROService - Remote diagnostic of software/hardware issues. Can control laser picomotors for remote alignment.
1045: Why we are getting a lecture on tandem dyes is beyond me, but oh well, at least I can get some work done in the
meantime. Hopefully we'll get back to the instrumentation soon.
1105: Kaluza - Named after German Mathematician and Physicist Theodore Kaluza
1355: By the way, Kaluza is awesome. Super snappy! Eats up large data files like nothing. Still not too sure about the fancy new tools like Radar, but it could be useful.
1410: MoFlo XDP overview. pretty much what you'd expect. The one nice thing is Intellisort II, which is basically a 1-button stream setup and drop-delay calculation. It does everything from setting the frequency, drop drive amplitude, phase, drop delay, everything.
1530: The MoFlo Astrios - Pretty much an attempt to automate many of the tasks needed to set up the MoFlo. 7-pinholes, 6-way sorting. Interestingly, the 7-pinholes take up the same vertical space as the 3-pinholes did on the MoFlo-XDP. This basically means that the beam height must be really small (~10um high?). So does a fully loaded system not have huge amounts of crossbeam spillover? Even after appropriately ordering the beams (e.g. put the UV next to the 640nm, and keep the 488nm away from the 532nm, etc...) there is still going to be some problems. I can only imagine that the hope is most people will want a 4 or 5-laser system at most, and then they can stagger the lines a bit more. What's the likelihood one will want to run all 7 lasers at the same time...probably pretty low. the 7-pinhole thing may simply be a marketing tool, but I could easily be proven wrong once I see some data. Hopefully later this year then.
1600: That's about all. Hopefully if you weren't able to attend, you got a peek at what went on here. signing off.
Friday, May 15, 2009
Never orphan your data again.
Picture this, you just finished running your samples on the Canto in R409, you've exported your data to the BDExport folder, and you reach into your pocket. Dang! You forgot your USB drive. You could walk all the way back to your lab in Billings in the pouring rain, but wait, you can just email the files to yourself. So, you log into the University's webmail system compose your email to yourself, attach your zipped folder of FCS files and you click send only to get a error that the file is too big to be sent over the University's network. What to do now? Do you just chance it and hope the computer doesn't crash before you come back tomorrow with your USB drive? I know I wouldn't. There is one other thing you can do. You can use NSIT's web-based file storage and sharing service. That's right, just by being a member of the University with a CNET ID, you can put up to 50MB 1GB of data on a server share and then pull it down at your desk. Just visit nsit.uchicago.edu/webshare and log in with your CNET and Password and voila, instant "USB Drive." Now grant it, it's not a ton of space, and it should really be 50GB, not 50MB 1GB, but, in a pinch, it may help. By the way, the powers that be can see/read whatever's on the server, so don't put any unencrypted personal information on there. Update: When I logged in, it was actually showing 1GB of space not 50MB like I had originally thought. YIPPEE!
Tuesday, May 12, 2009
Annual Core Fair, Thursday 5/14/09, Free Food!
Well, it's that time of year again. The Office of Shared Research Facilities (OSRF) is hosting its annual Core Fair this Thursday from 12:00 to 1:30 PM in the Gordon Center Atrium. Technical Directors and staff from over 21 core facilities will be available to discuss services, hand out literature and display posters featuring Core capabilities. The Flow Facility will have a table set up to showcase some of its new toys and services including information on its newly upgraded FACSAria II, its 4-laser LSRII, the new 561nm laser line on the MoFlo, and perennial favorite, the BioPlex. So you'll definitely want to stop by and get any and all your questions answered on how the techno-savvy core facilities can assist you in your research. As always, if you have questions regarding the services available from any core facility, visit the OSRF web site at osrf.uchicago.edu, and for any questions regarding Flow Cytometry Instrumetation and Services, you can certainly contact us or visit our web site (if you're not already there) at ucflow.uchicago.edu.
Monday, April 27, 2009
Beckman Coulter Resurfaces - Attend a Roadshow for info
It's remarkable to think that, until recently, the newest offering from Beckman Coulter was the FC500 (not counting acquisitions, like the Cyan and MoFlo)! It seems as though that is changing, rapidly. Beckman Coulter has recently announced two new players in the flow cytometer world. First up is the 3-laser, 10-color analyzer, Gallios. It seems pretty nice. I haven't gotten my hands on it yet, so I cannot give you the full run-down on it. They've certainly fixed a few problems that are found in their previous instrument (Colinear beams, more efficient light collection, better electronics, etc.) and so I'm sure it will be a huge step up from an FC500. However, there is still one thing that bugs me. It's billed as a RUO (research use only) instrument yet it has a tube carousel with a barcode reader on it!!! Seriously, who, outside of a clinical lab, uses a barcode system for their tubes. I find these carousel type loading systems to be really slow. I'd much rather pop tubes on and off, start and stop, add more buffer on the fly whenever I want. Instead, now I'm forced to use a carousel, and let it run. Not too happy about that. I do appreciate, however, the attention provided to light scattering. Light scattering seems like an afterthought on flow cytometers, but the Gallios has a forward scatter detector that can be optimized for small or large particles by adjusting the range of low angle light scatter detected. A wide position setting (1 to 19 degrees off normal) allows you to focus on smaller objects (bacteria, for example), while a narrow position (1 to 8 degrees) is ideal for larger cells. Lastly, you can use an enhanced wide angle module to focus in on submicron particle resolution. The data from this looks very promising.
The other new kid on the block is the Astrios (not sure about all the astronomical names), Coulter's new high-end cell sorter. First thing to note is, as I'm told, this is not a replacement of the MoFlo-XDP. The XDP will still be offered and developed. For how long? Who knows. The Astrios looks phenomenal. Here are a few stats: 6-way sorting, 7 spatially separated lasers, up to 30 fluorescence parameters, 0.3% Coincidence at 80,000 cells per second (cells, NOT beads). Is this for real? Time will tell, but after I wipe the drool from my mouth, I hope to get a test drive of this bad boy.
Along with the instruments, they will soon be releasing what I consider to be one of the best data analysis software packages around. Not just flow cytometry software, any data analysis software from any data intensive technology. It's called Kaluza, and it makes analyzing large data sets so easy and fast. I'm a FlowJo man, but the way this processes huge data files like it's nothing could turn anyone into a switcher. You just need to check it out to see it.
Speaking of checking things out, if you're in the Chicago-land area on May 21st, you can get an up-close-and-personal look at some of this technology. It's called the Flow Cytometry Big Bang Road Show, and it's coming to Chicago on May 21st, from 9AM to 4:30PM. More info can be found on the flow-centric Beckman-Coulter web site: www.coulterflow.com Or you can just go ahead and register for it here.
Friday, April 17, 2009
What is MFI?
If you've read any papers with flow cytometry data in it, undoubtedly you've come across the abbreviation, MFI. Generically, people expand this to Mean Fluorescence Intensity, but ironically, you'd rarely use the actual Mean of the population. Basically what the MFI is suppose to measure is the shift in fluorescence intensity of a population of cells. In cases where the entire population stains with different levels of an antibody (like measuring expression level of antigen x), it would be appropriate to report relative MFI values based on some sort of control (unstained, isotype, FMO, etc...) to demonstrate an increase or decrease in expression of this marker (assuming that each sample was stained with saturating amounts of antibody, and all samples were run under the same conditions and instrument settings blah, blah, blah). So, if you wanted to make measurements like this, what statistics would you use? When you analyze your data in software (e.g. FlowJo) you are given options to calculate the Mean, Median, Mode, and Geometric Mean. I've included a link which explains these measures in terms of flow cytometry data pretty well, so i won't bother going through that here. But, I will give you the punchline. When in doubt, use Median Fluorescence Intensity. Mean is pretty much useless, it doesn't work too well on a log scale, and for non-normal distributions, it is easily affected by outliers. I don't mean to be so mean when talking about the mean, but hey, for flow data on a log scale, why bother (sorry, i couldn't resist with the 'mean' pun). If you feel you must use an arithmetic average on a log scale, use Geometric Mean.
Tuesday, April 14, 2009
Welcome back Calcium Flux!
Is it just me, or does there seem to be a resurgence of calcium flux assays being done these days. Back in the day (don't laugh, I've been around for a relatively long time) calcium flux was pretty much standard procedure for immunologists and cell biologists alike. However, for various reasons, it fell out of favor over the past few years. Now, it seems like every few days, someone comes to talk to me about doing some calcium flux. You're probably well aware of Calcium's role in pretty much any cell activity, and the 'rapid' influx of the ubiquitous cation upon activation; so for those assays where you need to determine whether some stimulus actually causes the cells to increase activity or if that surface protein tail you modified causes a lack of downstream activity, this may be the perfect assay.
The way this assay works basically involves a fluorochrome which undergoes some sort of structural confirmation change upon binding Calcium, resulting in either an increase/decrease in fluorescence or a change in fluorescence absorption/emission. So, if you load that dye into a cell sample, you can track this change in fluorescence over time and quantify the rate of flux (how fast calcium rushes in), peak calcium flux (how much calcium rushed in), or duration of flux (how long the flux lasted). Some examples of these dyes include the perennial favorites, Indo-1, Fluo-4, and Fura Red, as well as some multitasking dyes like Oregon Green, and Calcein. Of course Molecular Probes (Invitrogen) has a calcium sensitive indicator dye in pretty much any color you can imagine. In addition to the favorites, they have a group of dyes cleverly called Calcium Green, Yellow, Orange, and Crimson. They all have slight variations in their chemistry, but all do pretty much the same thing. Whenever dealing with dyes and fluorochromes, there is no better place to look than the Molecular Probes Handbook, especially if you want way too much technical information than you could every imagine. Here's the link to the calcium indicator dye section if you want more info. Chapter 19, if you're a seasoned veteran of the handbook. The one major caveat that I need to bring up right here and now is that Indo-1 requires a UV light source, and not just any UV light source, it's gotta be really into the UV spectrum. We used to have a 325nm HeCd source, which was perfect for Indo-1. The only bad thing was the laser would only last about 6 months, and then the CVs were way too wide to be useable. We played that game for a couple of years, but have finally given up (almost) on UV altogether. We have violet sources, but no UV sources. But, do not fear, there are tons of options in every color for fitting in a Calcium indicator into your flow panel. And for any flow aficionados reading this post, yes we've tried the lightwave 355nm quasi-CW solid state laser. They are way too expensive, and only lasted about 18 months for us...we went through 2 of them. Our latest covetous thoughts are pointing us towards a 375nm diode. Not useful for Indo-1, but possibly good enough for DAPI cell cycle. As always, if you want to do calcium flux assays, but don't know how to get started, feel free to contact us day or night, but we'll probably only respond during the day.
The way this assay works basically involves a fluorochrome which undergoes some sort of structural confirmation change upon binding Calcium, resulting in either an increase/decrease in fluorescence or a change in fluorescence absorption/emission. So, if you load that dye into a cell sample, you can track this change in fluorescence over time and quantify the rate of flux (how fast calcium rushes in), peak calcium flux (how much calcium rushed in), or duration of flux (how long the flux lasted). Some examples of these dyes include the perennial favorites, Indo-1, Fluo-4, and Fura Red, as well as some multitasking dyes like Oregon Green, and Calcein. Of course Molecular Probes (Invitrogen) has a calcium sensitive indicator dye in pretty much any color you can imagine. In addition to the favorites, they have a group of dyes cleverly called Calcium Green, Yellow, Orange, and Crimson. They all have slight variations in their chemistry, but all do pretty much the same thing. Whenever dealing with dyes and fluorochromes, there is no better place to look than the Molecular Probes Handbook, especially if you want way too much technical information than you could every imagine. Here's the link to the calcium indicator dye section if you want more info. Chapter 19, if you're a seasoned veteran of the handbook. The one major caveat that I need to bring up right here and now is that Indo-1 requires a UV light source, and not just any UV light source, it's gotta be really into the UV spectrum. We used to have a 325nm HeCd source, which was perfect for Indo-1. The only bad thing was the laser would only last about 6 months, and then the CVs were way too wide to be useable. We played that game for a couple of years, but have finally given up (almost) on UV altogether. We have violet sources, but no UV sources. But, do not fear, there are tons of options in every color for fitting in a Calcium indicator into your flow panel. And for any flow aficionados reading this post, yes we've tried the lightwave 355nm quasi-CW solid state laser. They are way too expensive, and only lasted about 18 months for us...we went through 2 of them. Our latest covetous thoughts are pointing us towards a 375nm diode. Not useful for Indo-1, but possibly good enough for DAPI cell cycle. As always, if you want to do calcium flux assays, but don't know how to get started, feel free to contact us day or night, but we'll probably only respond during the day.
Tuesday, March 24, 2009
Amnis ImageStream S10... Keep your fingers crossed!
We submitted our Shared Instrumentation Grant for the Amnis ImageStream Analyzer on Monday, and now we wait. For those not familiar with the ImageStream, it basically works like a flow cytometer, but instead of just getting relative fluorescence intensity units of different fluorochromes, it images the cells in as many as 5 fluorescence channels as well as brightfield and darkfield. This allows you to do some pretty interesting things, like co-localization of fluorescence with subcellular structure as in Nuclear Translocation. Additionally, we've requested some optional equipment like more laser lines (405nm, 488nm, and 658nm), and an extended field of depth (EDF) optical configuration. The EDF is useful in situations where you have punctate staining patterns dispersed throughout the nucleus or cell, as in fluorescence in-situ hybridization assays (FISH) or nuclear foci counting, as in gamma H2AX staining post irradiation treatment. We feel this instrument will greatly enhance the research goals of our investigators. To illustrate this point, we supplied project descriptions from 17 Principle Investigators demonstrating exactly how they would use this instrument. The support from the faculty was really impressive. We submitted very strong projects as justification for the need for this instrument, which yields some level of confidence in actually being funded. So, wish us luck, and hopefully next spring we'll have an ImageStream on campus.
Wednesday, February 18, 2009
Luminex Vendors Wooing New Customers

Is it just me, or have you been inundated with vendors trying to get you to use their bead-based assay kits. The two big wigs in this field are BioRad and Millipore (listed alphabetically as to not show any preferential treatment on my part) and they really want your business. As you may know, the Flow Cytometry Facility has a BioPlex machine in the Kovler Facility which gets moderate use on a relatively regular basis. I've met with both companies' sales force and they are very interested in hosting some seminars to show their products' worth. Being an equal opportunity obliger, I agreed and so we will be hosting 2 seminars regarding multiplex analyte kits. The first one will be from BioRad on February 26th
Monday, February 9, 2009
Aria to Aria II upgrade...Painful, but worth it

Well that took way longer than expected. A two and a half day estimate went into its 5th day last friday. If anything could have gone wrong, it did. The procedure was going really well for the first two days, and then came the software. Why is it that whenever a problem occurs it always involves software glitches? Needless to say, it was a very frustrating afternoon on Thursday when we were completely stuck until the software started working properly. But, after some hard work and perseverance we finally got things up and running. We were able to start sorting on Friday, and to tell the truth, once we started, it became clear why we went through the trouble in the first place. The Aria started up so smoothly, and ran without a hiccup. You really can just pop in the nozzle and bam, the droplets just fall right into position. If you've ever tried to put the old-style nozzles in an Aria I (or had to use the wretched gold plated nozzles), then you'll really appreciate how easy it is on the Aria II. We've been running mostly with the 85um tip and have come to really appreciate that size. The 70um tip is good for going fast, but if the sample prep is not perfect, and the sample size homogenous and small, you get small jumps in the side streams which can really affect purity and yield. The 85um tip provides just enough room to still go pretty fast, and it's able to handle some junk too. The other thing that is instantly evident once you walk into the room is just how quiet the instrument is. The Aria I sounded like a rocket was taking off constantly, but now it's so quiet it's almost a little erie. Lastly, the charge plates are really nice. 4-way sorting is not even an issue any longer. In fact, the voltage sometimes is a bit too high so we've had to lower it to avoid hitting the plates with the side streams. So far, we've been really impressed with the performance of the instrument. One thing we're eager to get a feel for is how easy it is to keep clean. The jury is still out on that one, but we'll keep a close eye on it for sure.
Wednesday, February 4, 2009
Aria to Aria II upgrade...Day 2

Getting closer! Much of the Fluidics Board is hooked up and ready to go, the internal fluidic lines have been swapped. Today we'll tackle the flow cell, sample chamber, and sort block, and hopefully later, software and alignment. It probably seems like nothing has been done yet, but let me tell you, lots has been done. Bill and Scott (BD Engineers) have filled a 3' x 3' x 1.5' box with parts from the Aria I. Which reminds me, we'll have to find a new home for some of these parts, and the rest of them, well looks like I'll have to dig through some old Make magazines and see what we can put together.
Tuesday, February 3, 2009
Aria to Aria II upgrade...Day 1

The Flow Lab's legacy FACSAria is finally getting its fluidics upgrade today. The process takes about 3 days, so I'll give you some updates via photos. Day 1 was basically demo day, and the pic displayed here is the Fluidics area inside which has been totally ripped out. It looks a bit messy now, but the new system is much more stream-lined than the old. For those of you not familiar with the benefits of the fluidics upgrade, I'll give you a quick run-down and a bit of history. 1st the history. Sorters, for years have used a very simple process for driving fluidics; fill a tank with PBS, pressurize the tank at constant pressure, which causes the fluid to move through the system at a constant velocity, thereby giving a stable droplet break-off pattern. Enter BD and their quest to put a sorter on every researcher's desk. BD developed a fluidics system which was marketed as a "bench-top" sorter which could be run by anyone. Everything is automated, cleaning, sterilizing, running, monitoring, etc... In attempting to make this "easy-to-use" sorter, they created a service nightmare. There were so many valves and switches and pumps put in to do the simple job of moving PBS from a tank to a flow cell that at any given point, one of them was not working properly. Additionally, with all the valves and switches and automation came many small pieces of tubing and hangouts for bugs and bacteria. This created a situation where we had to jump through hoops trying to keep the sorter clean. Other sorters, like the MoFlo still had the classic fluidics system and, at least in our hands, had almost zero fluidics problems over about a 10 year period, and very few contamination issues with little effort. After a few years of complaints and retooling, BD releases the FACSAria II, and guess what? They got rid of a ton of valves, switches, hideouts, and once again went back to a simplified, robust fluidics system. It still has a few bells and whistles, but certainly not as grotesquely over-engineered as the Aria I. Will it withstand the onslaught of abuse only a core facility like ours can dole out? Only time will tell. Regardless, you'll hear about it here, so stay tuned.
Tuesday, January 6, 2009
How to choose - Part I
I am constantly reviewing new flow cytometry related technology, and I must admit, it's a pretty fun part of the job. So, over the years I think I've developed some strategies for choosing the proper piece of equipment which I will attempt to share in this "How to Choose" series. The Flow Cytometry Facility was recently awarded a Shared Instrumentation Grant from the NIH to purchase the LSRII it has been leasing for the past 8 months (see previous post for details). In approaching the original plan to acquire a new high-end analyzer, I went through this time-consuming process of evaluating multiple pieces of equipment in order to decide which one to get. Therefore, I will attempt to outline some of the key aspects which can hopefully translate to technology and equipment outside of flow cytometry. In general, the steps for choosing the proper instrument include, 1. Query your user base, 2. Establish selection criteria, 3. Research available technologies, 4. Match available technology with criteria, 5. Weigh non-technical aspects of ownership (e.g. Service, Infrastructure Necessities, Space, etc.), and 6. Test the instrument with real samples. I've gone through this process for equipment as complex as cell sorters, and as simple as incubators, and every time I feel the proper decision was made. The next few postings will detail the specifics of each of these 6 steps, so be sure to check back soon for an update.
Monday, January 5, 2009
Flow Cytometry Facility awarded NIH SIG
The Flow Cytometry Facility is pleased to announce that we have been awarded a Shared Instrumentation Grant from the NIH, which will be used to pay off the LSRII-Blue we have been leasing since April 2008. The facility recognized the necessity for such a high-end benchtop analyzer that we proceeded to lease the LSRII while resubmitting the grant proposal for the instrument. Needless to say we are very happy with the outcome of this proposal, and with the performance of the LSRII thus far. When publishing data using the facility's LSRII, you may acknowledge the facility as well as the SIG grant number for this instrument, 1S10RR24570-01A1.
Subscribe to:
Posts (Atom)